


The ISO setting on your camera lets you customize how sensitive the camera will be to light. For example if you have it set on 100 that is the lowest setting, which means that is the least sensitive it will be to light. Which is perfect if you are in daylight and have lots of natural light. But as you can see below an ISO of 100 is not enough light for our image. It is underexposed. An ISO of 400 allows for the perfect exposure.
100

200
400
800

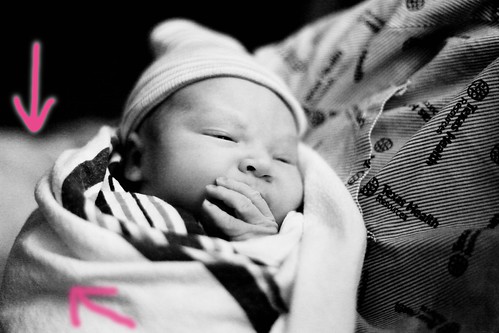
The only downside is when having a higher exposure you will see more "noise" or graininess in your image. The image below was taken from a birth I photographed. I had to use a very high ISO. Can you see the "noise" in the image?
To adjust the ISO that will vary from camera to camera. Check your manual to see how it is done with yours. Most cameras have a range of 100-1000.
Does this make sense? Questions?
Aperture tutorial is right here and shutter speed tutorial is coming next week!
I don't use flash. I am a natural light photographer. The only time during my shoots I have to use a higher ISO is when shooting a birth. (I do not shoot weddings. I definitely would see a need for flash in that situation.) Every other time I use a wider aperture (1.4-3.0) or I am outside and have plenty of light.


that makes PERFECT sense. just the other day i was experimenting with the iso and totally didn't get it. now i know better. thank you!!
ReplyDeletethis is a great tutorial and it all makes perfect sense!! i pretty much shoot on auto ISO right now b/c i used to adjust my own ISO but never could get it right. i also never really went higher than ISO 800 but i think that in certain settings when its dark or there is motion, it's ok to go up to 1600ish+yea?? i guess the only caveat is the grain... but if it makes for a better lighting and no blurriness, i am all for it!
ReplyDeleteSandy- Exactly! There are times that you have to sacrifice a crisp clear picture to get the shot. Just like the newborn picture above.
ReplyDeleteGreat tutorial.Now i see the difference and can adjust where needed
ReplyDeleteThis was great information. I just started playing around with my ISO button last week! I thought... oohhh cool. and then I got scared and stopped. But I think I'll play around with it a bit more.
ReplyDeleteThanks for the great info!
Makes perfect sense! Seeing the pictures with progressively higher ISO's made it into a very easy concept to understand.
ReplyDeleteThanks for the wonderful explination! Question...what's the diff. between ISO settings and changing the exposure compensation settings? I've been experimenting with exposure compensation...and I'm thinking it kind of does the same thing as ISO? Can you clarify? Thanks!
ReplyDeleteI could hug you! This makes so much sense! Thanks for having this blog....
ReplyDeletePeaceful Wishes,
Melissa Jo
http://www.thecutestchaos.blogspot.com/
Ooops...tired mommy brain = silly spelling mistakes! Please excuse my typo. I promise I really do know how to spell! :)
ReplyDeleteThank you so much for posting this with examples!! Do you have any real life examples for Aperture and Shutter speed?!
ReplyDeleteI know that "noise" is something that photographers wish to avoid, but I'd still rather have noise and no flash! And sometimes I love noise because it adds a texture to my photo. Maybe I'm weird :)
ReplyDeleteLadies, I updated this post. The last two paragraphs, hopefully answering some of your questions!
ReplyDeleteGreat post! I had to use an ISO of 1600 this past weekend because I was shooting towards dusk. I was able to fix the noise in Lightroom- thankfully.
ReplyDeleteI do wonder though if I was shooting in Manual and not Aperture Priority, if I could have adjusted the shutter speed myself to keep the ISO at 800 at least...
Looking forward to your shutter speed tutorial. :)
Great tutorial. I wish my camera did 100! It starts at 200.
ReplyDeleteI also don't use flash, so have to frequently resort to higher ISO inside. I usually convert high ISO shots to B&W since the graininess works for it.